Excalidraw is a Virtual whiteboard for sketching hand-drawn like diagrams.

It’s easy to create nice looking drawings.

image-20210819103204807

It’s available Online or we can self-host or even use it as one of the unofficial extension into VScode / VScodium

As drawing is stored as JSON, it’s also convenient to use it inside a git repo.

There are also some nice features like creating charts or using existing shared libraries.

Mindmap softwares are great to organize ideas.

minder

Minder from Trevor Williams combine everything I need/like:

  • Open source
  • Desktop client (not web app)
  • Multiples files open in tabs
  • Easy to use with keyboard (Tab, Enter, e, t …)
  • Several themes/layout (Automatic, left, right, manual etc..)
  • Customize style, borders, shapes etc..
  • Infinite workspace
  • Auto save
  • Middle click move
  • Zoom
  • Icon (stickers) / Images
  • Group several components (Node group)
  • Extra arrow to link 2 separate components
  • Task completed status
  • Import and export in multiple formats (Including SVG, Mermaid, Markdown etc)
  • Xml format (change tracking with git )

Install

There is a Debian/Ubuntu package we can install with apt-get install but this one is outdated, so better to install it another way like:

sudo apt install meson valac libmarkdown2-dev libgee-0.8-dev libgranite-dev libarchive-dev libgtksourceview-3.0-dev
git clone https://github.com/phase1geo/Minder.git
cd Minder
sudo ./app install

From time to time you may be requested to add your “hand written” signature to all pages of a document or contract.

But printing / signing / scanning every pages of a possibly long document is obviously not the best option.

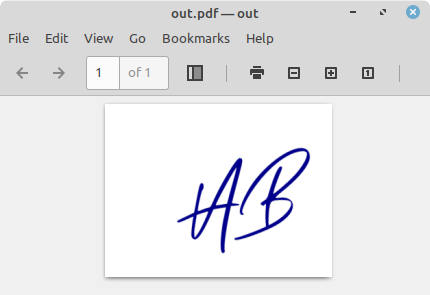
Creating the signature

  • Download and install some “handwritten” fonts you like
👉 convert -list font
  Font: Arista-Signature
    family: Arista Signature
    glyphs: /home/yannick/.local/share/fonts/Arista Signature.ttf

  Font: Autograf-PERSONAL-USE-ONLY
    family: Autograf PERSONAL USE ONLY
    glyphs: /home/yannick/.local/share/fonts/Autograf_PersonalUseOnly.ttf
  • Create signature

I’m using convert command from imagemagick software

 👉 convert -background transparent -rotate -10 -fill darkblue -font Arista-Signature -size 300x200 -gravity center 'caption:AB' out.pdf

image-20210510013415839

Creating the A4 page with the signature

PdfJam tool is used for this purpose

The pdfjam package makes available the pdfjam shell script that provides a simple interface to much of the functionality of the excellent pdfpages package (by Andreas Matthias) for LaTeX

The pdfjam script takes one or more PDF files (and/or JPG/PNG graphics files) as input, and produces one or more PDF files as output. It is useful for joining files together, selecting pages, reducing several source pages onto one output page, etc., etc.

  • Install
 👉 sudo apt-get install texlive-extra-utils
 👉 dpkg -L texlive-extra-utils | grep bin | grep jam
/usr/bin/pdfjam
  • Create a A4 signed page
--paper PAPERSPEC  (or simply --PAPERSPEC)
       Specify a LaTeX paper size, for example
       '--paper a4paper' or simply '--a4paper' for ISO A4 paper.
--scale 0.7   (to scale all input pages to 70% size)
--offset '1cm 0.5cm' (to offset all pages -- note the quotes!)
 👉 pdfjam --paper 'a4paper' --scale 0.2 --offset '7cm -12cm' signature.pdf

image-20210510014516043

image-20210510195448017

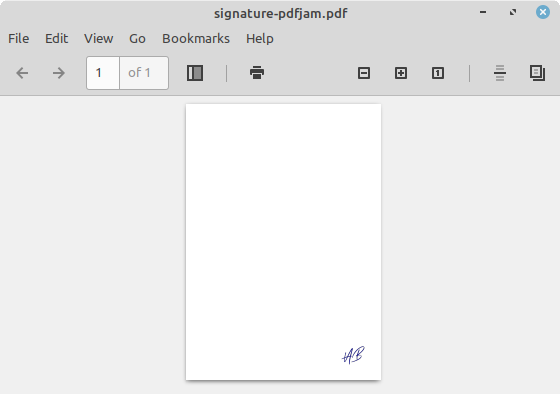
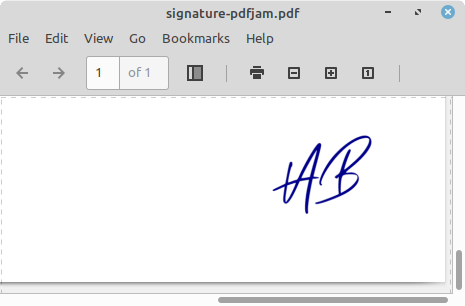
We have a page ready to be “merged” with existing pages of the document to sign.

Merging Pdf

This Debian Pdf will be our example document to add our signature into.

 👉 wget https://www.debian.org/releases/stable/i386/install.pdf.fr
 👉 file install.pdf.fr 
install.pdf.fr: PDF document, version 1.5
 👉 mv install.pdf.fr debian.pdf

To “merge” we are using pdftk

pdftk - A handy tool for manipulating PDF

 👉 sudo apt install pdftk
 👉 pdftk debian.pdf stamp signature-pdfjam.pdf output combined.pdf

stamp <stamp PDF filename | - | PROMPT>

This behaves just like the background operation except it overlays the stamp PDF page on top of the input PDF document’s pages. This works best if the stamp PDF page has a transparent background.

image-20210511092754833

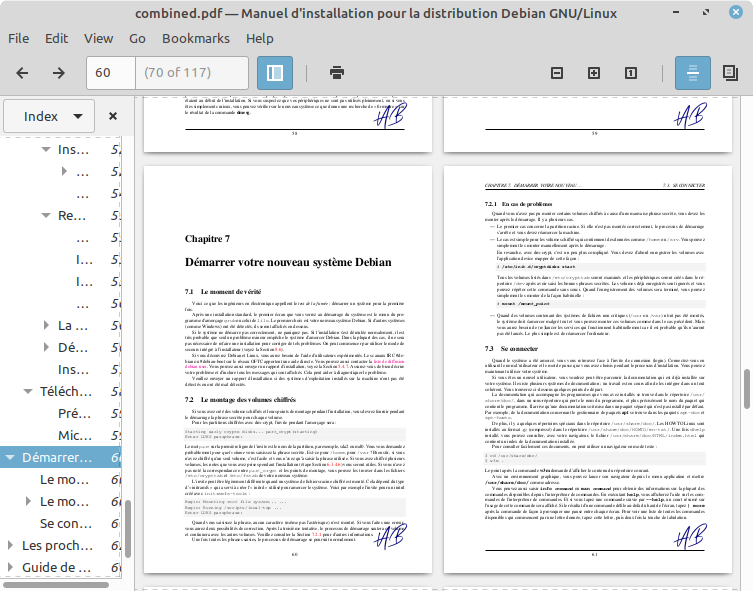
The signature is added to all pages of the document.

Apply to only some pages

In case only few specific pages needs to have the signature.

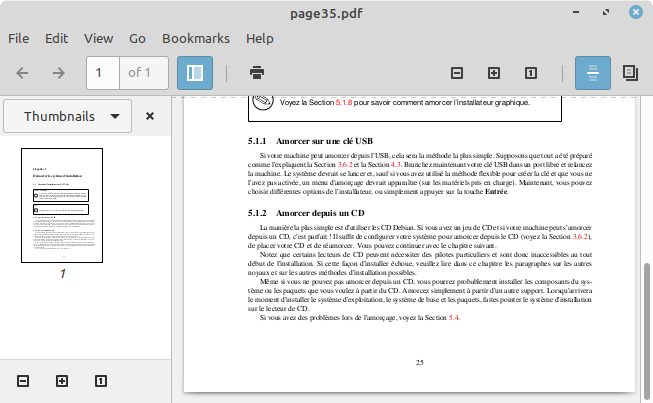
  • Extract pages to add signature into
 👉 pdftk debian.pdf cat 35 output page35.pdf 

image-20210511093707988

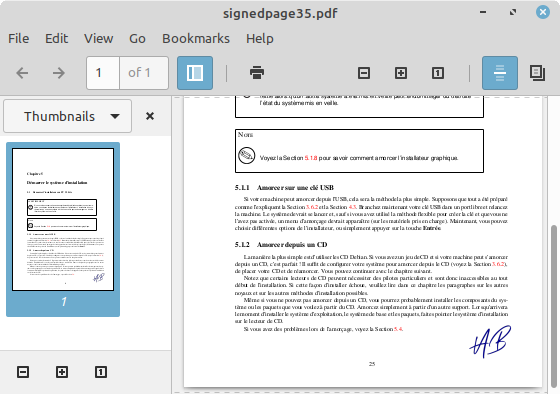
  • Add signature to those pages
 👉 pdftk page35.pdf stamp signature-pdfjam.pdf output signedpage35.pdf

image-20210511093840272

  • Assemble non signed, with signed pages
 👉 pdftk A=debian.pdf B=signedpage35.pdf cat A1-34 B A36-end output signed-onlypage35.pdf

image-20210511094308500

“Scanned” look

With the method above, the document will look as clean as it was before, lines can still be selected like into the original document, so recipient will be able to notice it’s not a “real” signature added on a scanned document.

Most people will not care, but in case some recipients care about it, we can add an extra step.

 👉 convert -density 130 signedpage35.pdf -rotate 0.33 -attenuate 0.15 +noise Multiplicative -colorspace Gray scanned-page35.pdf

This will make the document “not perfect” with some gray lines on the side and kind blurry like it could be with a scan process.

For large documents this may require to increase memory limit of ImageMagic.

 👉 identify -list resource
Resource limits:
  Width: 16KP
  Height: 16KP
  List length: 18.446744EP
  Area: 128MP
  Memory: 256MiB
  Map: 512MiB
  Disk: 1GiB
  File: 768
  Thread: 4
  Throttle: 0
  Time: unlimited
 👉 sudo vi /etc/ImageMagic-6/policy.xml
   <policy domain="resource" name="memory" value="256MiB"/>

image-20210511135414831

image-20210511135649039

It’s not common I have to write some “professional” looking letters, but it happen from time to time, like to cancel some service subscription.

As for years now I prefer to write in Markdown, I wanted something that could convert my markdown content to a nice looking Pdf output.

Aaron Wolen and Andrew Dunning are sharing on Github a template we can customize to our needs.

Install

 👉 git clone https://github.com/aaronwolen/pandoc-letter
 👉 cd pandoc-letter/
 👉 tree 
.
├── Dockerfile
├── example
│   ├── letterhead.pdf
│   ├── letter.md
│   ├── letter.pdf
│   └── signature.pdf
├── LICENSE
├── README.md
└── template-letter.tex

Create signature

It includes by default Aaron signature we need to modify

image-20210509173834197

  • Download and install some “handwritten” fonts you like
 👉 convert -list font
  Font: Arista-Signature
    family: Arista Signature
    glyphs: /home/yannick/.local/share/fonts/Arista Signature.ttf

  Font: Autograf-PERSONAL-USE-ONLY
    family: Autograf PERSONAL USE ONLY
    glyphs: /home/yannick/.local/share/fonts/Autograf_PersonalUseOnly.ttf
  • Create signature

I’m using convert command from imagemagick software

 👉 convert -background transparent -rotate -2 -fill darkblue -font Arista-Signature -size 500x200 -gravity center 'caption:Firstname Lastname' out.pdf
 👉 convert -background transparent -rotate -2 -fill darkblue -font Autograf-PERSONAL-USE-ONLY -size 900x200 -gravity center 'caption:Firstname Lastname' out.pdf

image-20210509174656701

image-20210509175022854

Edit TEX template

Edit template-letter.tex if required

\usepackage[french]{babel}
\newmdenv[rightline=true,bottomline=false,topline=false,linewidth=3pt,linecolor=greyborder,skipabove=\parskip]{blockquote}

Write the letter in Markdown

Write your letter.md file from the one into the example/ folder

---
author:
- Firstname Lastname
- My Organization
opening: To whom it may concern,
closing: Sincerely,
date:
subject: 'Objet: **Résiliation abonnement** '
address: 
- Recipient adress
- 123 Street Rd
- Chicago, IL
return-address: 
- My Home
- 456 Road St.
- Paris
cc:
encl:
ps: |
fontfamily: mathpazo
fontsize: 12pt
geometry: margin=1in
blockquote: true
#letterhead: example/letterhead.pdf
signature: signature1.pdf
signature-before: -5ex
signature-after: 1ex
#signature-width: 30ex
signature-width: 40ex
closing-indentation: 50pt
links-as-notes: true
colorlinks: true
...

On plaisante, on plaisante… On construit un barrage, après on lance de la caillasse de l'autre côté de la rivière pour faire croire aux autres qu'on a traversé dans l'autre sens, une fois qu'ils sont au milieu, on casse le barrage et on les noie.

- De toute façon le chevalier de Provence il faudrait déjà mettre la main dessus.
- Y en a marre de se comporter comme des sagouins avec tout le monde sous prétexte qu’on a des responsabilités.
- Vous avez dit que ça devait être vexant! Ben voilà! Vous êtes vexé! 


> A genoux, pas à genoux c’est une chose... 
> Enfin en attendant je vous donne pas tout notre or.

Mais arrêtez bon sang! C’est la salle du trône. Il ferait beau voir que je puisse pas y rentrer! Ben je suis pas mystérieux moi! J’suis même pas solitaire. 

Pandoc

Use pandoc to create the PDF

 👉 sudo apt install pandoc
 👉 pandoc --template=template-letter.tex example/letter.md -o myletter.pdf

image-20210509182706301

  • Let the date empty into the .md so it will be automatically set.

  • Using \usepackage[french]{babel} you can notice the date is in French language which may require sudo apt-get install texlive-lang-french texlive-extra-utils

  • Récupérer une image idéalement en 32x32

J’ai pris un .png par exemple sur IconArchive.
(Mes 2 lecteurs, partagez vos sources d’icônes pour bannière en commentaires)

  • Installation de quelques paquets

Je ne suis plus trop sûr de ce qu’il faut exactement mais probablement

 $ sudo apt-get install imagemagick texinfo openjdk-7-jdk coreutils perl git
  • Installation de util-say pour convertir les images en “texte”
$ git clone https://github.com/maandree/util-say.git 
$ ./util-say/img2ponysay dilbert.png > dilbert.txt 
Error: Unable to access jarfile ./util-say/util-say.jar 
$ cd util-say && make && cd .. 
$ ./util-say/img2ponysay dilbert.png > dilbert.txt
$ cat dilbert.txt 

Dilbert1

  • ponysay a rajouté les lignes avec les $ qu’il faut virer dans notre cas

Suppression de la ligne qui contient “balloon”:

$ sed '/balloon/d' dilbert.txt  

Suppression des lignes avec les $:

$ sed s/\\$\\\\\\$//g dilbert.txt  

Suppression des 5 premiers caractères de chaque ligne pour décaller l’image vers la gauche:

$ sed 's/^.\{5\}//g' dilbert.txt

Suppression des 3 premières lignes:

$ sed 1,3d dilbert.txt

Donc la ligne globale:

$ sed '/balloon/d' dilbert.txt \
     | sed s/\\$\\\\\\$//g  \
     | sed 's/^.\{5\}//g' \
     | sed 1,3d > dilbert_cleaned.txt

Dilbert2

  • Script pour rajouter du texte

On édite le script ci-dessous pour modifier la police, les couleurs, et toutes les infos que l’on souhaite.

#!/bin/bash
NAME="Server"
OUT="/tmp/$NAME"
IP_PRV=""
IP_NAT=""
IP_PUB="1.2.3.4"
SERVICE="XXXX Paris"
HD="1 x 50GB"

echo "" > $OUT
echo "" >> $OUT
echo "" >> $OUT

toilet -f Graffiti $NAME | lolcat -f -F 0.3 >> $OUT

cecho () {
  local _color=$1; shift
  echo -ne "$(tput setaf $_color)$@$(tput sgr0)"
}

black=0; red=1; green=2; yellow=3; blue=4; pink=5; cyan=6; white=7;
echo "" >> $OUT

#cecho $white "IP Prv:  " >> $OUT
#echo "$IP_PRV" | toilet -f term | lolcat -f -F 0.4 >> $OUT

#cecho $white "IP NAT:  " >> $OUT
#echo "$IP_NAT" | toilet -f term | lolcat -f -F 0.4 >> $OUT

cecho $white "IP Pub:  " >> $OUT
echo "$IP_PUB" | toilet -f term | lolcat -f -F 0.4 >> $OUT

cecho $white "Service: " >> $OUT
echo "$SERVICE" | toilet -f term | lolcat -f -F 0.4 >> $OUT

cecho $white "Disks: " >> $OUT
echo "$HD" | toilet -f term | lolcat -f -F 0.4 >> $OUT

cat $OUT

echo ""
echo ""
echo "File output into $OUT"

On peut bien entendu modifier le script pour récupérer les infos automatiquement du serveur et ne pas avoir a modifier les valeurs à la main.

  • On installe les 2 paquets suivants utilisés par le script au-dessus
$ sudo apt-get install toilet lolcat  

Allez voir le man de chaque commande pour les options.

  • On execute le script
$ ./ip.sh 

Dilbert3

A chaque execution, les couleurs seront un peu différentes

  • On joint les 2 fichiers en un seul
$ paste dilbert_cleaned.txt /tmp/Server > server.motd  

Dilbert4

  • On copie le fichier server.motd dans /etc/motd du serveur

  • Vérifier dans le /etc/ssh/sshd_config que vous avez bien la ligne PrintMotd yes